Whenever something goes wrong with your PC and a Windows function fails, crashes, or freezes. Then the most common recommendation is just to run the SFC Scannow Command tool. Also known as the system file checker, this handy tool will basically scan your Windows system files. In order to see if there are any corruption, damage, or inconsistencies. Whenever these issues are found, the SFC will also fix the files and typically solve your problem as well. In this article, we are going to talk about Windows Resource Protection Could Not Perform The Requested Operation. Let’s begin!
Unfortunately, if the SFC isn’t working properly, then you may get an error message whenever running it. Saying that the “Windows resource protection could not perform the requested operation”. Let’s now go over why this happens and how you can fix this issue.
Contents [hide]
- 1 What Is Windows Resource Protection?
- 2 Windows Resource Protection Could Not Perform the Requested Operation
- 2.1 Run a CHKDSK of Your Hard Drive
- 2.2 Run Your SFC Scannow in Safe Mode
- 2.3 Modify Security Descriptors
- 2.4 Run DISM commands
- 2.5 Turn on Windows Module Installer | Windows Resource Protection
- 2.6 Run Windows Update troubleshooter
- 2.7 Run Startup/Automatic Repair
- 2.8 Run Recovery Commands | Windows Resource Protection
- 2.9 Run %processor_architecture%
- 2.10 Conclusion
What Is Windows Resource Protection?
Windows Resource Protection (WRP) is basically a Windows resource that protects important system files and folders and registry keys from being replaced. It protects these components to prevent application and OS failures.
Basically, if WRP can’t perform an operation, then it’s because it thinks executing the function may make changes that could harm your system. Well, this may or may not be true though. If you guys are confident that what you’re doing isn’t going to harm your system (SFC is of course, harmless), then just go right ahead.
So, why the error Windows Resource Protection could not really perform the requested operation occurs whenever running SFC command?
- Damaged, corrupt, or missing files
- SFC cannot really access the winsxs folder
- Damaged Hard disk partition
- Corrupted Windows files
- Wrong System Architecture
Windows Resource Protection Could Not Perform the Requested Operation
Run a CHKDSK of Your Hard Drive
The first thing that you should do is check the condition of your hard drive disk along with a CHKDSK scan of your hard drive. This is an important step because if your disk is damaged or also has corrupted system files on it. Then this could be what is causing the “Windows resource protection could not perform the requested operation” SFC error message. Here is how you can run a CHKDSK on Windows 10.
- In your computer’s search bar, you have to type in Command Prompt.
- Right-click on the Command Prompt tool and then run as an administrator.
- In Command Prompt, just type in “chkdsk C: /r”
Please note: replace “C” with the drive where your Windows system files are located actually. Permitting that the chkdsk is successful and either fixes any errors, then your SFC scan should now work. Retry to confirm or move on to the next solution below as well. - Tap on Enter.
- Click Y to confirm you want the chkdsk to run on restart.
- Restart your computer to permit chkdsk to run its scan.
Run Your SFC Scannow in Safe Mode
If for some reason the chkdsk run fails as well as cannot repair any damage or corruption present and also you still get the “Windows resource protection could not perform the requested operation” SFC error. Then you can try running the SFC scan in Safe Mode.
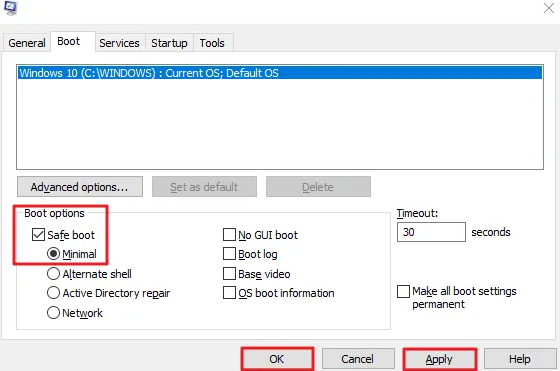
- In your computer’s search bar, you have to type in MSConfig. Click on enter on your keyboard and wait for the system configuration window to pop open.
- Tap onto the boot tab which is located beside the general tab at the top.
- Then check the box for “safe boot” under the boot options.
- Make sure “minimal” is check-marked and then click okay, and apply.
- Now restart your computer in order to reboot.

Now that you guys are in safe mode, run the SFC scan again. To do this, just search for the Command Prompt tool, right-tap to run as an administrator, and open. Now type in SFC /scannow [enter]. If the issue persists, then move on to the next solution below.
Modify Security Descriptors
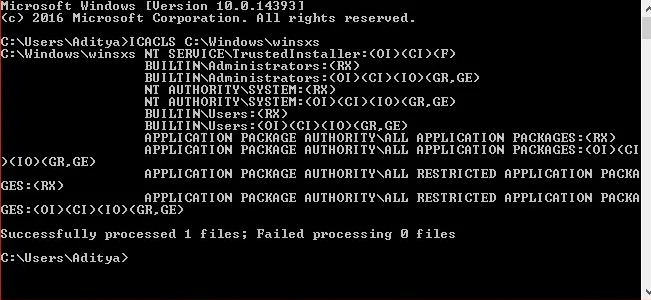
In many cases, the error occurs because the SFC cannot access the winsxs folder. So you have to manually modify the security descriptors of this folder in order to Fix Windows Resource Protection could not perform the requested operation error.
- 1. Press Windows Key + X and select Command Prompt (Admin).
- 2. Type the following command in cmd and hit enter:
ICACLS C:\Windows\winsxs

- 3. Close the command prompt and restart your PC.
Run DISM commands
- Tap on Windows Key + X and choose Command Prompt(Admin).
- Then type the following command in cmd and click on enter after each one:
Dism /Online /Cleanup-Image /CheckHealth
Dism /Online /Cleanup-Image /ScanHealth
Dism /Online /Cleanup-Image /RestoreHealth
- Now, wait till the DISM process finishes, and then reboot your PC. Now see if you’re able to Fix Windows Resource Protection could not perform the requested operation error.
Turn on Windows Module Installer | Windows Resource Protection
If you guys have disabled the Windows Module Installer on your PC, SFC Scan is unlikely to work. This tool is what actually checks and installs all windows updates to your computer automatically. If you guys have it disabled, now there might be bugs in your system that are actually causing the SFC scan to malfunction. Now here is what you can do.
- Tap on the Windows key on your keyboard + R in order to open the Run Dialogue box.
- Then type in services.msc into the Run dialogue box and hit okay.
- Find the Windows Module Installer in the list and then right-click it.
- Select to start it from the list.
Now try to run the SFC Scannow Command tool and see if you get the same“Windows resource protection could not perform the requested operation” SFC error or not.
Run Windows Update troubleshooter
- First, open your web browser and go to this link.
- Then select your version of Windows and also download the Windows Update Troubleshooter.
- Now double-click the downloaded file to run.
- Just follow the onscreen instruction in order to finish the process.
- Just restart your PC.
Run Startup/Automatic Repair
- You can insert the Windows 10 bootable installation DVD and then restart your PC.
- Whenever prompted to Press any key to boot from CD or DVD, tap on any key to continue.
- Choose your language preferences, and tap on Next. Tap on Repair your computer in the bottom-left.
- To choose an option screen, tap on Troubleshoot.
- On the Troubleshoot screen, just click the Advanced option.
- Then on the Advanced options screen, tap on Automatic Repair or Startup Repair.
- Now, wait till the Windows Automatic/Startup Repairs are complete.
- Restart and you guys have successfully fixed Fix Windows Resource Protection could not perform the requested operation; if not, then continue.
Run Recovery Commands | Windows Resource Protection
If you guys are still getting the error at this point, and also your current boot version of Windows is updated. Then you can boot into recovery mode and try to solve the issue this way by turning on the SFC scan utility via the command prompt. Here is how you can do this.
- If your PC is on, restart it through the power options.
- Whenever your computer begins its boot sequence, tap on F11 to enter recovery mode or use a bootable USB drive.
- When you are in recovery mode, then use the Command Prompt from the list of tools and click on run.
- Once Command Prompt is up and running, then just type in the following sfc/SCANNOW /OFFBOOTDIR=c:\ /OFFWINDIR=c:\windows [enter].
When the above command is entered and executed properly, then exit recovery mode and boot like you normally would to your Windows desktop. Now open up Command Prompt from your computer’s search, also run as an administrator, and run the SFC scan to see if the issue persists.
Run %processor_architecture%
- Tap on Windows Key + X and then choose Command Prompt(Admin).
- Then type the following command in cmd and hit enter:
echo %processor_architecture%
Now you guys know your computer architecture. If it returns x86, then you may try to run the SFC command on a 64-bit machine from the 32-bit cmd.exe.
In Windows, there are basically two different versions of cmd.exe:
%windir%\SysWow64 (64-bit)
%windir%\system32 (32-bit)
You guys must be thinking that the one in SysWow64 would be the 64-bit version. However, you are wrong as SysWow64 is actually a part of Microsoft’s deception. I am saying this as Microsoft does this in order to make the 32-bit application run seamlessly on a 64-bit Windows. SysWow64 works along with System32, where you guys can find the 64-bit versions.
Thus, what I have concluded is that SFC can’t run properly from a 32-bit cmd.exe found in SysWow64. If this is the case, then you have to do a clean install of Windows again.
Conclusion
If running an automatic repair does not really fix the issue and also you cannot get any of the other above solutions to work. Then the last resort option is just to do a fresh install of Windows. However, this is a bit frustrating, it will get you back up and running without even the error.
Alright, That was all Folks! I hope you guys like this article and also find it helpful to you. Give us your feedback on it. Also if you guys have further queries and issues related to this article. Then let us know in the comments section below. We will get back to you shortly.
Have a Great Day!


