Most of the Google Chrome users must have faced the ‘This site can’t be reached error‘, however, didn’t have any clue how to fix it? Then don’t worry we are at your disposal in order to fix this issue easily. The cause of this error is that the DNS lookup failed so the webpage is not available actually. In this article, we are going to talk about How to Fix This site that can’t be reached in Chrome. Let’s begin!
Whenever you guys try to open any website or web page, then you received the error and it basically says Error code:
This site can’t be reached
www.quora.com’s server DNS address could not be found.
DNS_PROBE_FINISHED_NXDOMAIN
Contents [hide]
How to Fix This site can’t be reached in Chrome
The server at any website can’t be found since the DNS lookup failed. DNS is actually the network service that translates a website’s name to its Internet address. This error is most often via having no connection to the Internet as well as a misconfigured network. It can also cause via an unresponsive DNS server or a firewall avoiding Google Chrome from accessing the network.
Whenever a DNS server can’t really convert a domain name to an IP address in a TCP/IP network. Then there is a DNS failure error actually. A DNS failure occurs due to the misconfiguration of the DNS address as well as due to the Windows DNS client is not working.
Change IPv4 DNS Address
- You have to right-click on the WiFi icon on the system tray and then just tap on “Open Network and Sharing Center.”
- Now just tap on “Network and Sharing Center“.
- Next, click on your current connection in order to open Settings and then tap on Properties.
- Then, you need to choose “Internet Protocol Version 4 (TCP/IP)” and tap on Properties.
- Now checkmark on “Use the following DNS server addresses.”
- Just type the following address in the Preferred DNS server and Alternate DNS server:
8.8.8.8
8.8.4.4
Note: Rather than the Google DNS you can also use other Public DNS Servers.
- Just checkmark on “Validate settings upon exit” then click OK and tap on Close.
- This step must really Fix This site can’t be reached error in Google Chrome as well.
Run Network Troubleshooter
- Just click on Windows Key + R then type ncpa.cpl and click on Enter to open Network Connections.
- Now right-click on your current active Wifi connection and then choose Diagnose.
- Then let the Network Troubleshooter run and it will actually give you the following error message: DHCP is not enabled for “Wireless Network Connection”.
- Tap on “Try these Repairs as an Administrator“.
- Now on the next prompt, just tap on Apply this Fix.
Restart DNS client | This site can’t be reached
- Tap on Windows Key + R and then type “services.msc” and click on enter to open the Services window.
- Just scroll down till you find “Network Store Interface Service” (tap on N to easily find it).
- Now right-click on Network Store Interface Service and then choose Restart.
- You need to follow the same step for the DNS client as well as the DHCP client in the services list.
- Now the DNS client will basically restart, go, and then just check if you’re able to resolve the error or not.
Reset TCP/IP
- You have to right-click on Windows Button and choose “Command Prompt(Admin).”
- Now type the following command one by one and click on Enter after each one:
1. ipconfig /release
2. ipconfig /all
3. ipconfig /flushdns
4. ipconfig /renew
- Just Reboot in order to save changes.
Reset Chrome Browser
Note: Make sure you guys back up your Chrome data before proceeding.
- You have to open Chrome Settings then scroll down to the bottom and tap on Advanced.
- Now from the left-hand side, tap on “Reset and clean up“.
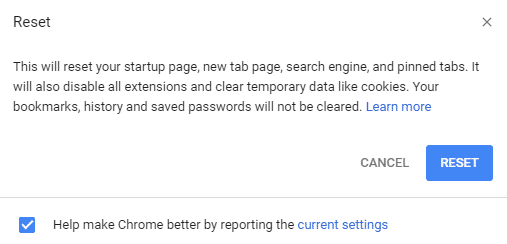
- Then under the Reset and clean up the tab, just tap on Restore settings to their original defaults.
- The below dialog box will then open up, when you guys are sure that you want to restore Chrome to its original settings, just tap on the Reset settings button.

Reinstall Chrome | This site can’t be reached
Note: Reinstalling Chrome will basically delete all your data so make sure you backup your data such as Bookmarks, passwords, settings, as well.
- Click on Windows Key + I in order to open Settings and then click on Apps.
- From the left-hand menu, and just choose Apps & features.
- Now scroll down, and then find Google Chrome.
- Tap on Google Chrome and then click on the Uninstall button.
- Now again click on the Uninstall button in order to confirm Chrome uninstallation.
- When Chrome uninstallation completes, then just reboot your PC in order to save changes.
- Now again download & then install the latest version of Google Chrome.
Conclusion
Alright, That was all Folks! I hope you guys like this article and also find it helpful to you. Give us your feedback on it. Also if you guys have further queries and issues related to this article. Then let us know in the comments section below. We will get back to you shortly.
Have a Great Day!
Also See:How to Save Snapchat Videos


