Telnet in Windows 10:
Want to use the Telnet application included with Microsoft in Windows 10? First, you need to enable the program. Here’s how it’s done. By default the telnet client in Microsoft’s Windows operating systems is disabled. This is unfortunate as it is an extremely useful tool. That we can use for testing TCP connectivity to external hosts on a specified port.
This is great when you’re trying to troubleshoot network connectivity problems. For example, say we have a web server that should be listening on port 80 to serve HTTP traffic. But we are not able to load a web page, by using telnet to connect to the webserver on port 80. We can verify the connectivity.
It may be that the connectivity is fine. But there is a problem with the webserver. Or that the webserver is stopped and the port is not listening at all, for instance. With telnet in windows 10, we can get a better understanding of what’s going on.
From Control Panel:
- Open “Control Panel“.
- Open “Programs“.
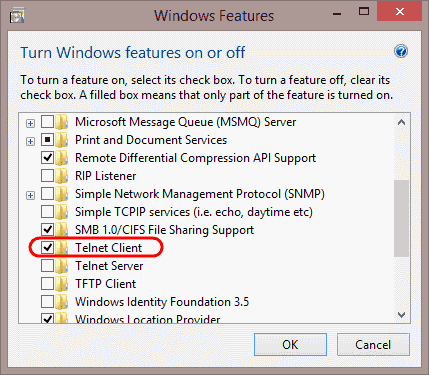
- Select the “Turn Windows features on or off ” option.
- Check the “Telnet Client” box.

- Click “OK“. A box will appear that says “Windows features” and “Searching for required files“.When complete, the Telnet client should be installed in Windows 10.
From Command Line:
You can also install the Telnet Client in Windows 10 by issuing a command.
- Hold down the Windows Key, then press “R“.
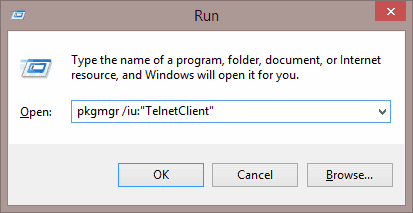
- The Run dialog box appears. Type:
- pkgmgr /iu:”TelnetClient”

- Select “OK” and Windows will install the Telnet client.
Already have telnet installed but still failing?
In some cases you must run command prompt or PowerShell as an administrator in order to issue the telnet command, otherwise, it will give the same error as if it was not enabled at all.
I hope you like this tutorial and it will help you with your problems. Have a Great Day!


