Whenever you pair and connect a Bluetooth device on Windows 10, you can see that it comes with a name. Whether it is some simple device like headphones, or it is a more complex one like a smartphone; they all have a name. The name for a Bluetooth device is usually the one given by the device manufacturer. The purpose of this name is just to enable the user to identify the device. Windows 10, however, uses a device’s MAC address instead of the name given by the manufacturer. And that is something a user can’t change. But there can be a case when you want to rename a Bluetooth device on Windows 10. This might be because you have multiple Bluetooth devices with the same name. And now it’s hard to differentiate among them. Or there could be a simpler reason that you just don’t like the default name of that device. Whatever the case might be, I’m here to tell you how you can rename a Bluetooth device on Windows 10 in a very simple way. So let’s have a look.

Before you do anything of the sort, however, you need to turn the Bluetooth on. You might already know how to do that. If not then don’t worry, let me show you how.
Contents [hide]
Turn on Bluetooth
- Click “Windows button” in the bottom left of the desktop. Or press the Windows key.
- “Start menu” will pop-up.

- Click on the gear-shaped “Settings” icon.
- The “Settings window” will open.

- Choose the “Devices” option.
- Click on the switch under “Bluetooth” to turn it on.

Now that you have successfully turned Bluetooth on, you can move on to rename the Bluetooth device.
Recommended: “Can’t take Screenshot” on Android: Learn how to fix it
Rename a Bluetooth Device on Windows 10
- “Turn on Bluetooth” on your Windows 10 PC.
- “Connect the Bluetooth device” that you want to rename.
- Open “Control Panel”.

- Choose “Hardware and Sound” option.
- Then go to “Devices and Printers” option.

- Move cursor to the “device you want to rename”.
- “Right-click” on it.
- In the drop-down menu, click “Properties”.

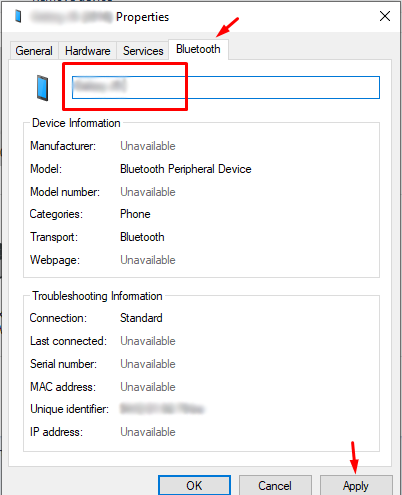
- In the Properties window, go to the “Bluetooth tab”.

- Here, next to the device’s icon is its default name and it can be edited.
- Click on the “name field”.
- “Rename the device” as you like.
- Click on “Apply” button.
- Now, “close the window”.
Now in order to rename it, you need to turn the device off and then on again. Just disconnect it from the PC and then re-connecting would not suffice. The new name will appear when you turn the device on again after turning it off once. And the name will be saved in the reboot.
So when you turn off the device and then turn it on again, go to the Control Panel. Go to Hardware and Sound, and then to Devices and Printers option. There you can see that the device’s new name has appeared. This means you have successfully renamed the Bluetooth device on Windows 10.
A Few Things to Remember
So now you have successfully renamed your Bluetooth device. There are, however, a few things regarding the matter at hand that you need to remember and that might come in handy.
- The device should get renamed once you turn it off and then on again. But if that doesn’t happen, then try it by turning the Bluetooth off along with the device. And then turn both of them on again. If that still doesn’t work, then you need to try the system restart for that.
- Disconnecting and reconnecting the device will not change its name that you have given.
- If the device’s driver gets updated somehow, there might be a chance that the device’s name goes back to the default one.
- If you unpair the device and then pair it again, it will be paired with its default name. And you will have to rename it again.
- Renaming the Bluetooth device has to do with your system. That is the one in which it has been renamed. If you pair and connect the device with some other system such as some other Windows 10 PC or smartphone, there it will have its default name.
I hope this article answered all your queries on how to rename a Bluetooth device on Windows 10. If you have any queries left, don’t hesitate from asking them away in the comments section. So have a good time renaming your Bluetooth devices as you like. Best of luck!!!
Read More: How to fix Twitch not working on Chrome


