Whenever we install a new Operating System, we do not always have a new anti-virus or anti-malware software lying around. We take a bit of time in order to install it — if ever — which is the ideal time for malicious software to land a killer blow actually. Well, Windows 10, the Windows Defender makes sure you remain protected, always, even when you aren’t paying any attention to it. We are all for the perks that the Defender brings. However, it’s hardly the most efficient or the most software out there. In this article, we are going to talk about How to Turn Off Windows Defender – Tutorial
Contents [hide]
What actually is Windows Defender?
Well, Windows Defender (now known as Microsoft Defender Antivirus) is an always-on, anti-malware software that protects your computer from external threats. The antivirus is developed by Microsoft in order to protect computers from virus threats that are running the Windows 10 operating system.
This antivirus basically comes preinstalled with any version of Windows 10. Windows Defender protects your computer in realtime from not only viruses, but also ransomware, rootkits, trojans, spyware, and many forms of malicious attacks as well. The program is absolutely free to use, and Microsoft sends regular updates on Windows 10.
What are the key advantages of Windows Defender?
As mentioned above, the Defender comes along with the Windows 10 package, by default — no separate installation needed. It provides you decent enough protection and a handy offline scan option to get the job done even if you are not connected to the internet. It’s really basic in terms of features, of course. However, it’s surely not the worst one you could have.
Why would you want to turn off Windows Defender?
Windows Defender is actually a great basic anti-malware solution. However, it becomes redundant whenever you have a powerful, standalone anti-malware software on your computer actually. Technically, microsoft Defender is supposed to turn off itself after it detects a new anti-virus. But, there is no way for you to see it in action, which makes it really difficult to understand if the microsoft Defender is still using your PC’s invaluable resources.
How to turn off Windows Defender the official way?
For those who are unaware, Windows Defender does give you the option to turn it off. But, this method, for better or worse, is not permanent. After it is turned off, Windows Defender turns itself on after a really short period of time. Microsoft has not yet documented the exact time period, and we are unlikely to get a definite answer any time soon as well.

In order to get around this annoying problem, some of the crafty Windows users tweaked the registry settings to turn Windows Defender off good. They simply enabled the ‘DisableAntiSpyware’ key in order to turn off Windows Defender effectively. But, as we have learned from the recent Windows update, the registry key method has been turned off by Microsoft.
Registry key method removed – Why?
As hinted in the previous section, some super-smart Windows users found a way to turn off Windows Defender through enabling the DisableAntiSpyware button in the Windows Registry. Although not super convenient, but it still gave users the option to get rid of the anti-malware if they wanted to. Now, after the recent updates, the toggle has patched off, however, not without even good reason.
Microsoft had identified that malicious software used that Registry trick in order to turn off Windows Defender and fly undetected under the radar. Now, with the Registry trick disabled, there’s actually no way for them to bypass microsoft Defender.
How to turn off Windows defender for a short period of time?
If you guys are fond of downloading games and applications of the internet. Then you are likely to encounter scenarios where the application asks you to turn off your antivirus in order to paste the crack file also. For those awkward situations, you must look for ways to turn off microsoft defender, albeit temporarily. We basically have two ways to achieve this.
From Settings on Windows
It is possible to turn off Windows Defender from Settings itself, however, it only is a temporary solution. Microsoft also states that the Defender is auto-enabled after a particular period of time, but they do not mention specifics. But, if you are curious, then you can restart the microsoft Defender service along with a restart.
- In order to disable microsoft Defender, first, locate the search bar at the bottom of your screen, and then type in “Windows Security.”
- When the screen loads, you have to click on ‘Virus and threat protection’. In order to explore the settings related to your microsoft Defender system.
- Then scroll down, locate ‘Virus & threat protection settings,’ and tap on ‘Manage settings.’
- At last, toggle off ‘Real-time protection.’
Using Defender Control
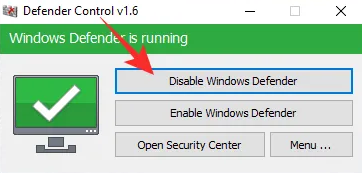
As we have seen already, Defender Control is actually one of the easiest applications to use. All you need to do it download it, extract, run, and then tap on ‘Disable Windows Defender’

In order to re-enable, you have to tap on ‘Enable Windows Defender.’
How can you turn off Windows Defender via Group Policy:
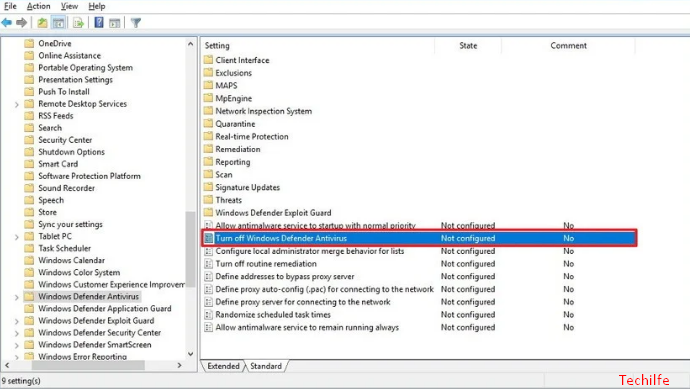
Well, on Windows 10 Pro, it is really possible to use the Group Policy Editor in order to turn off the Windows Defender Antivirus permanently.
- First, use the Windows key + R keyboard shortcut in order to launch the Run command.
- Then type gpedit.msc and tap OK to open the Local Group Policy Editor.
- Then browse the following path:
Computer Configuration > Administrative Templates > Windows Components > Windows Defender Antivirus - Now on the right side, double-tap the Turn off Windows Defender Antivirus policy.
- Choose the Enabled option.
- Tap Apply.
- Press OK.
- You have to browse the following path:
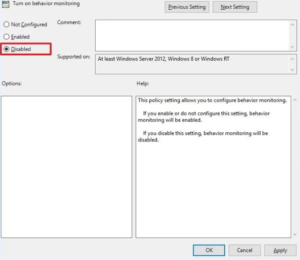
Computer Configuration > Administrative Templates > Windows Components > Windows Defender Antivirus > Real-time Protection - Now on the right side, you need to double-tap the Turn on behavior monitoring policy.

- Choose the Disabled option.
- Press Apply.
- Then click on OK.
- Then on “Real-time Protection,” you guys have to double-tap on the Monitor file and program activity on your computer policy.
- Select the Disabled option.
- Click Apply.
- Click OK.
- On “Real-time Protection,” double-tap the Turn on process scanning whenever real-time protection is enabled policy.
- Choose the Disabled option.
- Press the Apply.
- Tap on OK.
- Now on “Real-time Protection,” double-tap the Turn on behavior monitoring policy.
- Choose the Disabled option.
- Tap on Apply.
- Then click OK.

- Then restart your computer.
When you have completed all of these steps. The Windows Defender Antivirus will no longer scan and detect malware on your device, even after restarting your computer as well.
Conclusion
Alright, That was all Folks! I hope you guys like this article and also find it helpful to you. Give us your feedback on it. Also if you guys have further queries and issues related to this article. Then let us know in the comments section below. We will get back to you shortly.
Have a Great Day!
Also See: What is the Normal and Good CPU Temp


