Trim video in Windows 10:
Windows 10 has a hidden video editor that works a bit or just like Windows Movie Maker or Apple iMovie. It can Trim video in Windows 10. You can use it to trim videos or also your own home movies and slideshows. You can even have it create videos automatically. This feature is also a part of the Photos app.
Anyways, after recording videos with my smartphone, I often need to trim parts of the video files. Fortunately, Microsoft Windows 10 has tools that provide an easy way to trim a video. And believe me, I am in love with this feature because it makes my life so easy. Like now, I don’t have to download those useless different types of apps to trim a single video. Which actually takes a lot of space from my phone. So, in short, I used to hate all these downloading things, etc. And the cause of Windows 10’s this feature. I am (like), really very happy. Just follow these steps to know:
Steps to Trim a Video:
- right-click the video file, and choose “Open with” > “Photos“.
- Select the “Trim” button located at the upper-right portion of the window.

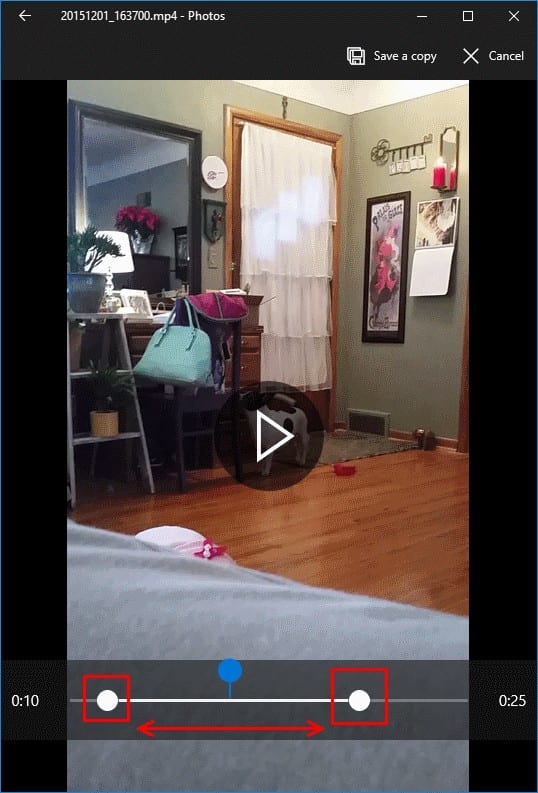
- Then slide the two white sliders to where the portion of the video you wish to keep is in between them. The blue slider only shows the current frame and has no bearing on trimming.

- Once you have the area of the video you wish to keep selected to trim, click the “Save a copy” option located at the upper-right portion of the window.
- At last, give the video file a new name. Once saved, it will be the new trimmed version of the video.
I hope now you know what to do to trim your video. However, it is really a good feature, which can save you from getting a virus in your PC and phone as well cause now, you don’t have to download a video trim app. Anyways, if you still have any queries related to this article. You can freely ask me in the comments section below. Have a Good Day!


