On Windows 10, many times it can be frustrating when trying to print, and the document stucks in the queue. And if you try to cancel the job, then it will stay deleting forever as well. In this article, we are going to talk about How to restart Print Spooler in Windows 10. Let’s begin!
Although there can be a lot of reasons why you can’t print, that includes connection problems or issues along with the printer itself. Basically, it is a problem with the “print spooler” on Windows 10 actually. This is a service that spools print jobs and handles interactions with the printer, and most of the time it will stop working, even after restarting your device and printer as well.
If you guys are experiencing this problem, then it is possible to fix this particular printer issue through resetting the print spooler on your computer. Using the Services console or Command Prompt as well.
So, in this guide, you guys will learn the steps in order to fix the print spooler on Windows 10 to fix your printer.
How to fix print spooler using Services | Restart Print Spooler
In order to fix the print spooler service to continue printing on Windows 10. You guys have to use these simple steps:
- First, open Start on Windows 10.
- Then search for services.MSC and press the top result to open the Services console.
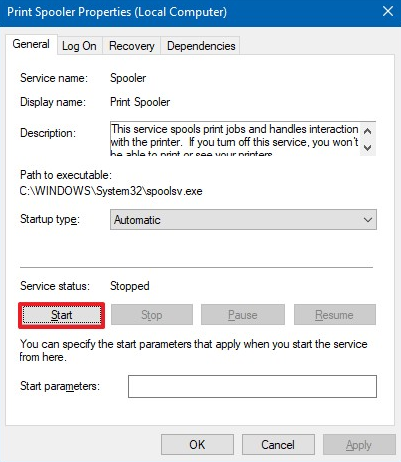
- Right-click the Print Spooler service and then choose the Properties option.
- Press the General tab.
- Press the Stop button.
- Now use the Windows key + R keyboard shortcut to open the Run command.
- Then type the following path and tap Enter:
C:\Windows\System32\spool\printers
- Press the Continue button (if applicable).
- Choose everything in the printers folder (Ctrl + A keyboard shortcut) and then tap the Delete button to remove all its content.
- Tap on the General tab.
- Then click the Start button in order to restart the spooler.

- Press the OK button.
When you complete all of these steps, then you can try to print a document one more time, and the printer should work as expected as well.
How can you fix print spooler using Command Prompt | Restart Print Spooler
In order to instantly fix print spooler problems via Command Prompt. Then you gotta use these simple steps:
- First, open Start.
- Search for Command Prompt, right-tap the top result, and then choose the Run as Administrator option.
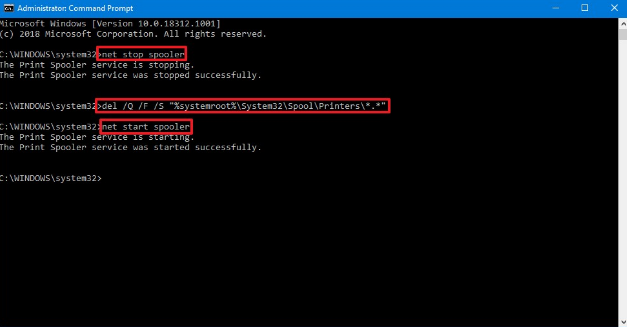
- Then type the following commands to stop the print spooler, delete the printers folder content. And then restart the printer spooler, and tap Enter (on each and every line):
net stop spooler
del /Q /F /S "%systemroot%\System32\Spool\Printers\*.*"
net start spooler

When you complete all of these steps, then you should be able to print a document one more time, and your printer should work now actually.
However, this guide focuses on Windows 10, the ability to reset the “Print Spooler” has been around for a really long time. That means that you can use these steps on Windows 8.1, Windows 7, and also older versions as well.
What you have to do if print spooler keeps stopping on Windows 10? | Restart Print Spooler
Uninstall unnecessary printers
Having two or more printers installed can most of the time cause issues with Print Spooler and printing as well.
If Print Spooler keeps stopping on your Windows 10 PC, then you might be able to fix this problem through uninstalling the printers that you do not use.
In order to do that, you have to follow these steps:
- First, tap Windows Key + X to open Win + X menu and then choose Control Panel from the list.
- When the Control Panel opens, then you have to locate Devices and Printers.
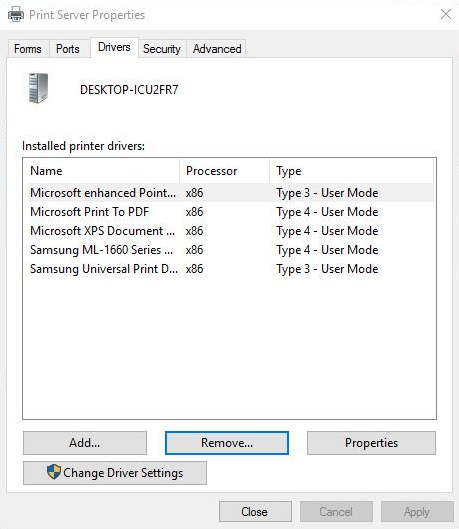
- In the Devices and Printers section, choose the printer you want to remove and tap on the Print server properties.
- Head to the Drivers tab. You should see the list of all installed printers now.
- Choose the printer that you want to remove and click the Remove button

- Then select Remove driver and driver package and tap OK to completely remove the printer.
- After you remove unnecessary printers, then restart your PC.
Keep that in mind that this might be a solution only if you had two or more printers installed on your PC. Most of the time printer drivers can cause Print Spooler service to stop working, so be sure to remove them all.
Delete Print Spooler files | restart print spooler
Most of the time Print Spooler service can keep stopping because of Print Spooler files. And one way in order to fix this problem is to remove those files.
Before you can remove these files, you first need to disable Print Spooler service by following these simple steps:
- Tap on the Windows Key + R and type services.msc. Then click Enter.
- When the Services window opens, then you have to locate Print Spooler, right-click it, and select Stop.
- Minimize Services window and head to C: WindowsSystem32spoolPRINTERS folder. Keep in mind that you will need administrator privileges in order to access it. Also, the folder can be hidden sometimes, so you have to make sure you have the option to view hidden files turned on.
- When you open the PRINTERS folder, then delete all files within.
- At last, disconnect your printer from your PC.
Conclusion
Alright, That was all Folks! I hope you guys like this “restart print spooler” article and also find it helpful to you. Give us your feedback on it. Also if you guys have further queries and issues related to this article. Then let us know in the comments section below. We will get back to you shortly.
Have a Great Day!


