Microsoft does not really offer a direct upgrade path. It is also still possible to upgrade your PC running Windows XP or Windows Vista to Windows 10. But, you’ will need to perform a few extra steps in order to create a bootable installation media, backup your data, and perform a clean installation of Windows 10 on your system. In this article, we are going to talk about How to Perform Windows 10 Upgrade from XP or Vista. Let’s begin!
Contents [hide]
Upgrade to Windows 10 without losing files and apps
Just like that, users who want to migrate their files, apps, and settings, can purchase a copy of Windows 7, upgrade their current installation, and then upgrade to Windows 10. But, a clean install of the OS will not only save you time and money however, it also it will help users to start with a fresh installation as well.
Before you begin
If you are still using Windows Vista, then it is likely that your computer has low hardware specifications, considering today’s standards. Before going through the upgrade process, you guys have to make sure your device meets the minimum hardware requirements in order to install Windows 10.
These are the official minimum system requirements for running Windows 10:
- Processor: 1GHz or faster processor or SoC.
- Memory: 1GB for 32-bit OS or 2GB for 64-bit OS.
- Storage: 16GB for 32-bit OS 20GB for 64-bit OS.
- Graphics card: DirectX 9 or later with WDDM 1.0 driver.
- Display: 800 x 600.
When you know that your device can handle the new OS, then you will need to purchase a genuine copy of Windows 10. You guys can get a copy of Windows 10 Home or Windows 10 Pro at the Microsoft Store.
Plus, you will also need a USB flash drive with 8GB of storage to create a bootable media.
How can you create a full backup on Windows XP or Vista
Before moving forward with the upgrade, you have to make a backup of your files to an external drive. And make sure you have the installation files and product key in order to reinstall any software after the upgrade.
You could also try to make a full backup of your system, however, Windows XP or Windows Vista do not feature a “reliable” backup tool. But, you could try a third-party software, like Macrium Reflect. It cost a little bit of money, but if anything goes wrong, then having a backup will make sure you can go back as well.
How to Perform Window 10 Upgrade from XP or Vista
You guys won’t be able to use the Media Creation Tool on Windows Vista or XP to download and create a bootable media actually. This means that you will have to use another computer that runs Windows 7/8.1/10 to create the installation media. Or you will need a third-party tool like Rufus to create a USB bootable media along with the Windows 10 ISO file.
Create Windows 10 bootable media
Use these simple steps in order to create a USB bootable media to install Windows 10:
- First, open the Rufus official website.
- Under the “Download” section, tap the link to download the latest version (3.5 or later).
- Double-click the executable to open the tool.
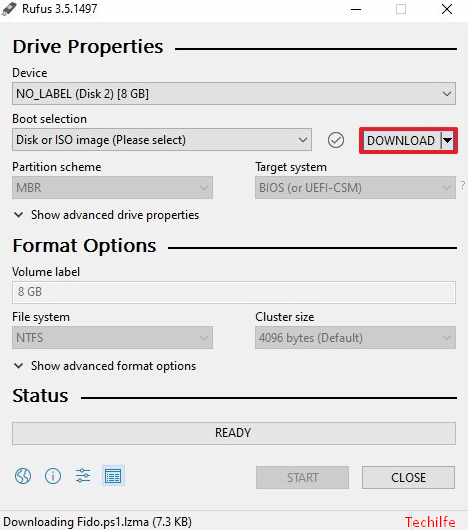
- Under the “Device” section, use the drop-down menu, and then choose the USB drive. That you want to erase and use in order to create the installation media.
- Under the “Boot selection” section, use the drop-down menu and then choose the Disk or ISO image option.
- Now on the right side, click the down arrow button and select the Download option.
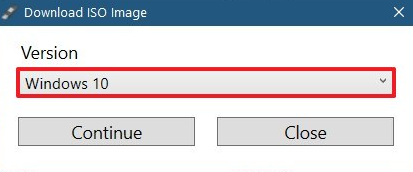
- Tap on the Download button.

- Choose the Windows 10 option.

- Press the Continue button.
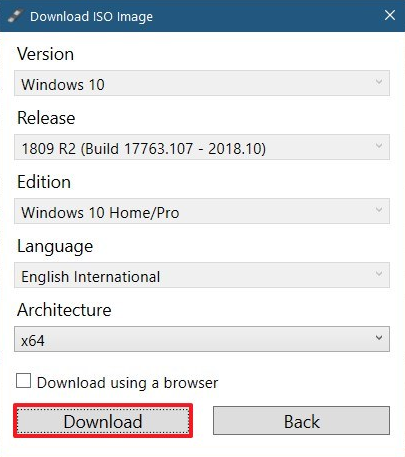
- Then under the “Release” section, select the version of Windows 10 that you want to download.
- Now tap on the Continue button.
- Choose the edition, that includes Windows 10 Home or Windows 10 Pro, or Windows 10 Education.
- Tap the Continue button.
- Choose the language of Windows 10.
- Tap the Continue button.
- Select the operating system architecture (x64 or x86). (If it’s a newer device, mostly, you will choose the x64 option.)
- Click the Download button.

- Then select the location in order to save the Windows 10 ISO automatically.
- Now use the default selections after the download.
- Tap the Start button.
- Tap on the OK button to confirm the deletion of the USB drive data.
When you complete the steps, then you can proceed with the clean installation of Windows 10.
Perform a clean installation of Windows 10
Use these simple steps to upgrade to Windows 10 from Windows XP or Windows Vista through a clean installation:
- You have to start your PC with the USB bootable media.
- Tap any key to begin.
- Then tap the Next button.
- Press the Install now button.
- Enter the product key and then tap the Next button.
- Check the I accept the license terms option as well.
- Tap the Next button.
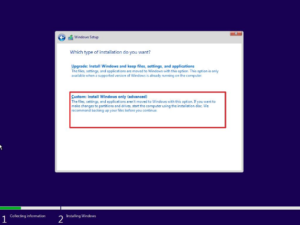
- Choose the Custom: Install Windows only (advanced) option.

- Select each and every partition in the hard drive that you want to install Windows 10, and click the Delete button. (Mostly, the “Drive 0” is the drive that contains all the installation files.)
- Choose the hard drive (Drive 0 Unallocated Space) to install Windows 10.
- Tap the Next button.
- After the installation, choose your region on the first page of the out-of-the-box experience (OOBE).
- Tap the Yes button.
- Choose your keyboard layout.
- Tap on the Yes button.
Then | windows 10 upgrade from XP
- If you are not setting a second keyboard layout, then click the Skip button.
- If your device is using an Ethernet connection, then your device will connect to the network automatically. And if you are using a wireless connection, then you will need to set up the connection manually.
- Choose the Set up for personal use option.
- Tap on the Next button.
- Then type your Microsoft account email, phone, or Skype identification.
- Tap on the Next button.
- Type your Microsoft account password as well.
- Tap on the Next button.
- Tap the Create a PIN button.
- You have to create a new PIN password.
- Tap on the OK button.
- Press the Yes button if you want to use Timeline across devices.
- Tap the Do it later button in order to skip linking your phone to your PC. (You guys can always do this from the Settings app.)
- Then click on the Next button to set up OneDrive automatically. (Just like that, you can click the Only save file to this PC option to skip this step.)
- Click the Accept button to turn on Cortana on your device. (If you want to use the “Hey Cortana” feature, then you have to check the Respond when I say “Hey Cortana” option.)
- You have to select your privacy settings that best suits your needs.
- Tap the Accept button.
After Windows 10 is completely installed, then it will present with the new desktop and all the new features. At this time, it’s really a good idea to go to Windows Update using the Settings app to check for new updates. Also, head to Device Manager to check your computer hardware is working correctly or not. Then you do not need to reinstall any driver now.
Conclusion
Alright, That was all Folks! I hope you guys like this article and also find it helpful to you. Give us your feedback on it. Also if you guys have further queries and issues related to this article. Then let us know in the comments section below. We will get back to you shortly.
Have a Great Day!
Also See: Robocopy Exclude Directory in Windows 10


