Paint is a really basic drawing tool. It is not an image editing tool although some of its tools may be used in order to edit an image. For those that are skilled, we can also use it to draw well but it is still a basic app. What that actually means is that it doesn’t really have layers nor does it allow users to change or add an alpha channel. That said, it does support the PNG format that can save an image with transparency. Adding a transparent background in Paint is possible, however, it’s not simple. In this article, we are going to talk about How to Make Background Transparent in Paint. Let’s begin!
Contents [hide]
Paint transparent background
On Windows 10, you guys have the Paint app that has been around since Windows 98. And there is Paint 3D which is a new app added in Windows 10 in order to create 3D projects. We’re going to show you how you guys can make a background transparent in both apps.

How to Make Background Transparent in Paint
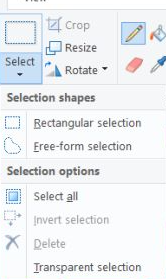
Open in Paint the image that you want to make a transparent background. You guys will see a ‘choose’ button on the toolbar. Tap on the dropdown under it.
You guys will see two selection options; Rectangular selection, and also Free-form selection. You can select either one of these tools and they will then do the job. The trick is basically to know what suits your image and how skilled you guys are with selecting or outlining an object along with a mouse or trackpad, or whatever device you have. The rectangle selection tool only lets you guys outline or select items in a rectangle. The Free-form tool does not really confine you to a particular shape and makes for a more accurate selection around an object.
You can use one of the tools and choose only the part that you’d like to include in the image. Each and everything outside the selection will be removed. When you guys have made the selection, open the choose dropdown again, and choose the ‘Invert Selection’ option. Click on Delete. The background will be deleted leaving only the selected object on the canvas as well.
You can save the image. The background is going to be white and that’s really how the Paint handles transparency actually. It does not support the alpha channel so you can’t really get the same transparent background you could if you were to use Paint.net or you can also use Paint 3D.
How to make an image transparent in Paint 3D
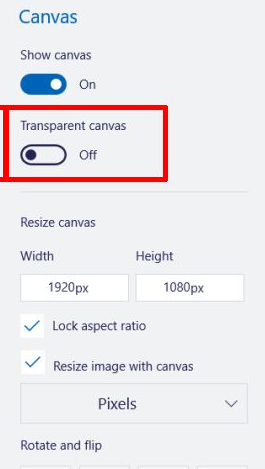
First, open the image in Paint 3D. At the top, you are going to see a bunch of controls as well. You have to select Canvas. A panel will then open on the right. In this panel turn on the ‘Transparent canvas’ switch as well.

Press the ‘Select’ tool and then create an outline around the object that you want to include in the image. Each and everything outside it will be removed. Paint 3D does not have a free-form selection tool. Rather, it actually has a tool called ‘Magic select’. Tap on it. It will automatically delete content around the object that it thinks you don’t want to include. You can also select to accept or reject this selection.
Another option to play along with here is the ‘Autofill background’ option. Uncheck it, and see how accurate the selection actually is. If it’s not accurate, repeat the selection process, however, do not uncheck the ‘Autofill background’ option.
When you select your object, then press the copy button.
Then, open a new Paint 3D file. Head to the Canvas tab again, and then turn on the transparent canvas option. When the option has enabled, you can then paste the copied selection from the previous file into the new one as well.
Well, the object will be pasted on a transparent background. You can now save it as an image as well. Whenever it’s saving, also make sure you save it as an image and in the PNG format.
Other apps
Paint and Paint 3D actually comes installed out-of-the-box on Windows 10. In a pinch, they’re reasonably good apps to use actually. Paint 3D is better than Paint but if you have a little time. Then you can learn how you can make a background transparent along with Paint.net or along with GIMP. It’s really easy to do because it supports layers. GIMP is actually a bit more complicated to use as its UI isn’t the most intuitive. However, you essentially have to add an alpha layer to an image.
In both cases, you guys have a ‘magic wand’ tool that permits users in order to make selections around an object more easily. GIMP also has a free-form selection tool that permits users in order to trace a fine or also accurate path around an object and choose it.
If you guys have Photoshop, you can use it to make a background transparent. The reason we don’t recommend via Photoshop is that it’s subscription-based and also a bit complicated to learn. If you guys already own the app, you can then use the selection of the magic wand tool in order to choose the item you want to keep and remove the background. The alpha channel is enabled via default and just like Paint, Photoshop also lets you invert the selection as well.
Conclusion
Alright, That was all Folks! I hope you guys like this article and also find it helpful to you. Give us your feedback on it. Also if you guys have further queries and issues related to this article. Then let us know in the comments section below. We will get back to you shortly.
Have a Great Day!
Also See: facebook2zip – Download Facebook Photo Albums in Zip Format


