Gmail is actually an easy-to-use and convenient email service that permits you to send and receive emails on your Gmail account. Well, there is more to Gmail than just sending emails. You guys also have the option of saving email drafts and sending them later. However, sometimes whenever you try to send an email, then they get stuck in the Outbox and Gmail may queue it to send later. The emails getting stuck in the Outbox can also be an annoying issue whenever you are trying to send some important emails. Thus, to help you out, we also have come up with a small guide that you guys can follow to fix emails stuck in the outbox of Gmail. In this article, we are going to take about How to Fix Email Stuck in Outbox of Gmail. Let’s begin!
Contents [hide]
- 1 How to Fix Email Stuck in Outbox of Gmail
How to Fix Email Stuck in Outbox of Gmail
You may also have experienced this issue when you try to send an email. However, they get stuck in the Outbox and Gmail queue the mail to send later. The question is Why does this really happen? Well, there may be many reasons why you can face this issue. Some of these common reasons are as follows, just have a look.
- The email may have a really large file attachment exceeding the limit.
- You guys may have an unstable internet connection as well.
- The problem may arise because of the improper configuration of your account settings.
We are now listing the possible solutions to fix emails stuck in the Outbox of Gmail. You have to follow these methods and then check whichever works for you:
Check Internet Connection
Many times, your email may get stuck in the Outbox of Gmail if you guys have an unstable internet connection. If you have a slow as well as unstable internet connection. Then Gmail may not be able to properly communicate with its servers and will queue your email in the Outbox in order to send it out later.
Hence, to fix emails stuck in Outbox queued and not sending in Gmail, you have to make sure that you have a stable internet connection. You guys can also check your internet connection by performing a speed test using a third-party speed test app. Further, you can also check the connection by browsing something on the web as well as using an app that requires the internet.
You guys can also unplug and re-plug the power cable of your router in order to refresh your Wi-Fi connection.
Check file size
If you are sending an email along with a file attachment like documents, videos, PDFs, or pictures. Then, in this situation, you just have to make sure that the file size does not exceed the limit of 25 GB. Gmail permits users to send an email along with file attachments within the size limit of 25GB.
Hence, the email may be stuck in the Outbox if you are exceeding the file size limit. But, if you want to send an email with a large file attachment. Then you can upload the file in Google Drive and then send the link to the drive-in your email.
Clear cache and app data
Many times, the app’s cache and data may also be hogging the memory and causing the emails to get stuck in the Outbox. Thus, to fix the emails from getting stuck in the Outbox, you can just clear the App’s cache.
On Android
If you are using Gmail on your Android device, then you may follow these steps in order to clear the app’s cache:
- Go to the Settings of your device.
- Head to Apps then click on Manage apps.
- Now just locate and open Gmail from the list of applications.
- Click on Clear data from the bottom of the screen as well.
- Now, choose Clear cache and tap on OK.
On Computer or Laptop
If you guys use Gmail on your Chrome browser on a PC as well as a laptop. Then you may also follow these steps in order to clear Gmail’s cache on Chrome:
- First, open your Chrome browser tap on the three vertical dots in the top-right corner of the screen, and head to Settings.
- Tap on the Privacy and Settings just tab from the panel on the left.
- Now, head to Cookies and other site data.
- Tap on See all cookies and site data now.
- Now, just search mail in the search bar on the top-right of the screen.
- At last, click on the bin icon that is next to mail.google.com in order to clear Gmail’s cache from the browser.
After clearing the cache, you can just try sending the emails from the Outbox and check if this method was able to fix the email stuck in Gmail.
Enable the allow background data usage option | Email Stuck in Outbox
If you guys use mobile data as your internet connection, then it may also be possible. That the data saving mode may be enabled on your device actually. That may also restrict Gmail from using your mobile data for sending or receiving emails. Hence, to fix the email stuck in the Outbox issue, you can just enable the allow background data usage option on your Android device.
On Android
If you guys actually use the Gmail app on your Android device. Then you can just follow these steps to enable the allow background data usage option:
- First, open Settings on your device.
- Head to the Apps section and then click on Manage apps.
- You have to locate and open Gmail from the list of applications that you guys see on the screen. Click on Data usage.
- At last, just scroll down and make sure you turn on the toggle next to Background data.
On iOS
If you guys are iOS users, you may then follow these steps to enable background data usage:
- Go to the Settings of your device.
- Then head to the Mobile data tab.
- Scroll down and then locate the Gmail app from the list of apps.
- Lastly, turn on the toggle next to Gmail. Whenever you turn on the toggle, Gmail can now also use your cellular data to send or receive emails.
After permitting the background data usage, you can just try sending the emails that are stuck in the Outbox.
Check if Gmail is not on Offline mode
Gmail also offers a feature that permits you to search, respond, and even go through the mails even when you guys are offline. Gmail automatically sends out emails whenever you guys are back online. Offline mode can also be a handy feature for many users. But, this feature may also be the reason why your emails get stuck in the Outbox of Gmail. Thus, to fix an email stuck in the Outbox of Gmail, then make sure you disable the offline mode on Gmail.
- Just go to Gmail on your web browser on a desktop as well as laptop.
- You have to log in to your account through typing your username and password.
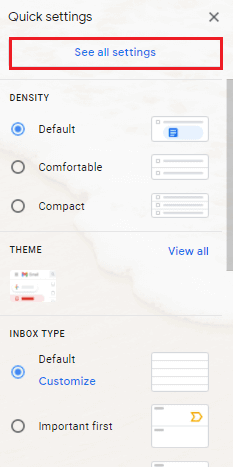
- When you successfully login into your account, you need to tap on the “gear icon” at the top-right corner of the screen.
- Tap on “See all settings“.

- Just head to the Offline tab from the panel on the top.
- At last, untick the checkbox next to the option “Enable offline mode” and then tap on Save Changes.
Now, you guys may refresh the website and then try sending the emails in the Outbox in order to check. If this method was able to fix Gmail outgoing emails marked as queued as well.
Close background running apps
Many times, closing the background running apps can also help you fix the problem of emails getting stuck in the Outbox. Thus, you can close all the background running apps and then try to send out the emails from the Outbox as well.
Update the Gmail app | Email Stuck in Outbox
You guys may be using an old version of the app on your device, and it may also be causing your emails to get stuck in the Outbox. The old version of Gmail may also have a bug as well as an error that may be causing the problem, and the app is also unable to communicate along with the servers. Therefore, to fix emails not sent in Gmail, you guys can check for available updates on your device through following these steps:
On Android
If you use Gmail on your Android device, then you can also follow these steps in order to check for updates:
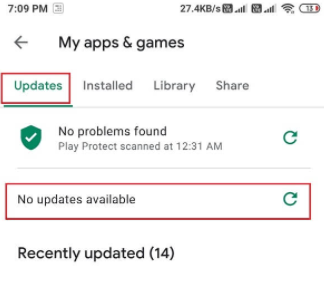
- You have to open the Google play store and click on the hamburger icon on the top-left corner of the screen.
- Head to My apps and games.
- Click on the Updates tab from the panel on the top.
- At last, you guys will see available updates for Gmail. Click on “Update” in order to install the new updates.

After updating the app, you can then try to send out the emails from the Outbox.
On iOS
If you guys are iPhone users, then you may also follow these steps in order to check for available updates:
- You also have to open the App store on your device.
- Tap on the Updates tab from the bottom of the screen as well.
- At last, check if there are any updates available for Gmail. Click on Update in order to install the new updates.
Conclusion
Alright, That was all Folks! I hope you guys like this article and also find it helpful to you. Give us your feedback on it. Also if you guys have further queries and issues related to this article. Then let us know in the comments section below. We will get back to you shortly.
Have a Great Day!


