Discord Roles: Discord is the voice and text chat solution and it’s the choice among online gamers these days. This is because it is so awfully configurable and has several different choices and settings that users can do almost anything they want within the app. However, the drawback is that assigning the appropriate permissions to people can be an enormous task. On Discord, there are 13 server-level permissions, 9 text permissions, and 7 voice permissions. Also, each of these permissions is a binary option, so there are 536,870,912 possible combinations of permissions.
Contents [hide]
- 1 DISCORD ROLES
- 2 DISCORD PERMISSIONS
- 2.1 GENERAL PERMISSIONS
- 2.1.1 Administrator:
- 2.1.2 View Audit Log:
- 2.1.3 Manage Server:
- 2.1.4 Manage Roles:
- 2.1.5 Manage Channels:
- 2.1.6 Kick Members:
- 2.1.7 Ban Members:
- 2.1.8 Create Instant Invite:
- 2.1.9 Change Nickname:
- 2.1.10 Manage Nicknames:
- 2.1.11 Manage Emojis:
- 2.1.12 Manage Webhooks:
- 2.1.13 Read Text Channels & See Voice Channels:
- 2.2 TEXT PERMISSIONS
- 2.3 VOICE PERMISSIONS
- 2.1 GENERAL PERMISSIONS
- 3 HOW TO ADD ROLES IN DISCORD
- 4 HOW TO MANAGE ROLES IN DISCORD
- 5 HOW TO DELETE ROLES IN DISCORD
- 6 MORE INFORMATION
- 7 Conclusion:
DISCORD ROLES

Input the “role”. In Discord, a “role” is defined as a set of permissions with a name. For example, there is a default role called “@everyone,” which gives a huge range of basic permissions like talking on the server and reading the messages but without any administrative privileges. Also, a server administrator creates a role called “Moderator” which adds the ability to mute or ban other users. Users can also be assigned different roles and they always have the largest combination of role powers.
DISCORD PERMISSIONS
There are 29 permissions on Discord that are divided into General, Text, and Voice permissions. We’ll let you know each and every permission briefly:
GENERAL PERMISSIONS
Administrator:
The Administrator’s permission allows all the permissions that exist on the server. This is very dangerous permission to access as it gives a lot of power.
View Audit Log:
The permission allows the user to read the server’s audit logs.
Manage Server:
It grants the user to change the server name or move it to a different region.
Manage Roles:
This permission enables the user to create new roles and edit roles that don’t have any manage roles permission turned on.
Manage Channels:
It allows the user to create, edit, and delete channels on the server.
Kick Members:
Kick Members allows the user to kick members off the server.
Ban Members:
The permission enables the user to ban members from the server.
Create Instant Invite:
It allows the user to invite other users to the server.
Change Nickname:
It grants the user to change their own nickname.
Manage Nicknames:
This permission also allows the user to change the nicknames of other users.
Manage Emojis:
The permission enables the user to manage emojis on the server.
Manage Webhooks:
It enables the user to create, edit, and delete webhooks.
Read Text Channels & See Voice Channels:
It grants the user to read the message channels.
TEXT PERMISSIONS
Send Messages:
It allows the user to send messages on the text chat.
Send TTS Messages:
Permission enables the user to send text-to-speech messages.
Manage Messages:
Manage messages allows the user to delete or pin messages from other users.
Embed Links:
The permission allows the user to embed hyperlinks in the chat.
Attach Files:
Allow the user to attach files in the chat.
Read Message History:
Enable the user to scroll back and access previous messages.
Mention Everyone:
It allows the user to check push notifications for the members of the channel.
Use External Emojis:
Allow users to use emojis from other servers.
Add Reactions:
It also allows the user to add new reactions to a message.
VOICE PERMISSIONS
Connect:
Grant the user to connect (i.e., hear) to the voice channel.
Speak:
It allows a user to speak on the voice channel.
Mute Members:
Enable the user to turn off another user’s ability to speak.
Deafen Members:
Also, Grant permission to the user to turn off another user’s ability to listen on the channel.
Move Members:
It enables the user to move other members from one channel to another.
Use Voice Activity:
Grant access to the user to speak without using Push-to-Talk.
Priority Speaker:
Enable users to decrease the volume of other users when this user is speaking so that their words are louder on the channel.
HOW TO ADD ROLES IN DISCORD

Setting up your roles properly is the key to managing your users on a Discord server. Also, it’s a good idea to have the basic roles created before you even begin inviting people to the server. You can also go back and add new roles or reconfigure old roles once you’re in business.
- Log into Discord and then access your server.
- Choose the small drop-down arrow to the right of the server name and tap “Server Settings.”
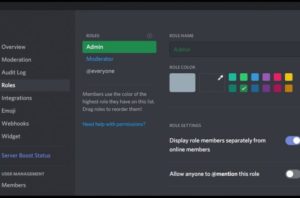
- Tap “Roles” in the left pane. Now you should see a single role called @everyone.
- Tap the “+” icon to add a role.
- Assign descriptive name and color to the role.
- Also, review all 28 permissions, toggling on only the ones you want to be associated with that role.
- Choose “Save Changes.”
- Repeat for each new role you want to create.
Assigning the different permission levels to different roles enables you to create a hierarchy according to trust. You can also assign lower roles to newbies and higher roles to those you know well.
To assign a role to a user:
- Choose a user you want to work within the right-hand pane.
- Pick the small “+” under the username and choose the role from the menu.
- Now repeat this for each user on your server.
You can also add roles more efficiently by right-clicking on the user. Choosing Roles, and then tapping on the role(s) you want to add in the flyout menu.
Make sure you can add as many roles as you want for each user.
HOW TO MANAGE ROLES IN DISCORD
Managing roles in Discord is as same as creating them. You can also add more roles should you need to and change the permissions within each. As your society grows, you can also add others. Because roles have to be added individually to each user, also it is the most effective use of your time is to put as much of your server’s policy decisions as possible in the @everyone role. So that users by default will grant the permissions that you want them to have.

Also remember the left column on the Roles page, which shows the names of all the roles you have created. Usernames on the server will show the color of the highest role assigned to a user.
HOW TO DELETE ROLES IN DISCORD
Rarely you would need to delete a role in Discord, as you could just not assign it. However, if your account is becoming messy with unused roles, here’s how you can delete them.
- Choose the small dropdown arrow next to your server and select “Server Settings.”
- Choose “Roles” in the left pane and select the role you want to delete.
- Scroll down and tap the “Delete [role name]” button.
- Confirm by tapping “Okay.”
MORE INFORMATION
Role management is a difficult part of keeping a Discord server organized, specifically it gains users.
Make sure there is a limit of 250 different roles on a specific server. This should not be a limitation in practical terms, but don’t start defining every possible combination of permissions that you might ever want to use. Also, you’ll run out of roles quickly and efficiently if you do that. Besides, focus on what the *social* function of a specific role is.
Make sure to open feedback from your users and especially from the moderators you select to help you run the server. Also, if they repeatedly tell you that they want specific permissions, they probably do.
Conclusion:
For further queries and questions let us know in the comment section below. Also, drop a comment if you want to share anything.
Till then! Keep Smiling


