Sometimes, after a clean install of Windows 10, you guys may notice an unusual user account labeled “defaultuser0” in the C:\Users directory actually. The confusing aspect about this is that in spite of its existence in the ‘Users’ folder. The defaultuser0 can also miss from the ‘User Accounts’ section in the Control panel as well. In this article, we are going to talk about How to Remove defaultuser0 Account on Windows 10. Let’s begin!
If you guys are an active part of the Windows Insider Program, then you might have even seen this defaultuser0 on the sign-in screen of some builds as well. Now the question that arises– why is this ‘defaultuser0‘ account present in Windows 10 and should you care about it or not?
What Actually Is ‘defaultuser0’ Account in Windows 10 And Why Should You Care About It?
The defaultuser0 is nothing but just a small bug present in Windows 10 builds. Some systems may also show it is defaultuser(). It is basically a user account neither part of any user group nor it has any profile or not. Consider these facts, that it is actually safe to remove it as well. However, you might be thinking about what will occur if you do not remove it?
Well from past experiences, it has also observed that most of the times this defaultuser0 can create complex situations for you, such as:
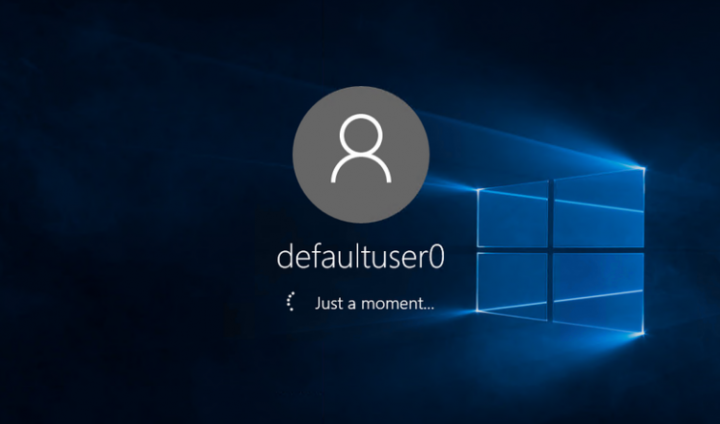
- You guys performed Reset to Windows 10 and your account is lost. Then Windows 10 forces you to log in as ‘defaultuser0‘ (the below-mentioned image illustrates this). However, there is actually no password set for that user account and you are now stuck. From this point, you have got the only option left is to make a clean install via wiping your data and wasting your time.
- In most of the cases, defaultuser0 again appears on a clean install and there might be a repetition of what I said in point 1 actually.
How to Remove defaultuser0 Account on Windows 10
Since the ‘defaultuser0‘ can safely remove, the best bet is basically to remove it as soon as you guys realize that it is present. But, if you feel that you want to keep that account, then it is important that you set a known password for it. Both ways are mentioned here as well.
Delete ‘defaultuser0’ Completely
- First, just boot Windows 10 into Safe Mode.
- Then open lusrmgr snap-in through running lusrmgr.msc command.
- Tap on the Users folder and then right tap on defaultuser0 entry. Choose Delete. Close lusrmgr snap-in as well.
- Also, you have to delete the defaultuser0 folder from C:\Users (replace C: with your system root drive).
- Tap on the Windows + R and put regedit in the Run dialog box in order to open Registry Editor. Then you need to click OK.
- Now in the left pane of the Registry Editor window, then navigate to the following registry key:
HKEY_LOCAL_MACHINE\SOFTWARE\Microsoft\Windows NT\CurrentVersion\ProfileList

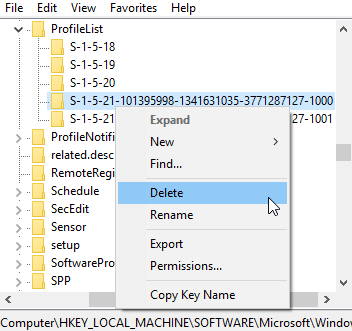
- You need to expand the ProfileList registry key, and you guys will see some sub-keys. That is beginning with S-1-5…. Highlight each sub-key one by one and in the right pane as well. Now just look ProfileImagePath registry string (REG_EXPAND_SZ). The data corresponding to it should also help you to decide which is the correct registry SID sub-key for defaultuser0 as well. Whenever you guys spot the exact one, right-click on it and then choose Delete. Now close Registry Editor. Reboot to normal mode as well.
In this way, you guys can delete the defaultuser0 account.
Set A Password For defaultuser0
If you guys are not comfortable in deleting defauluser0. Then you can also go with these steps in order to set a password for it.
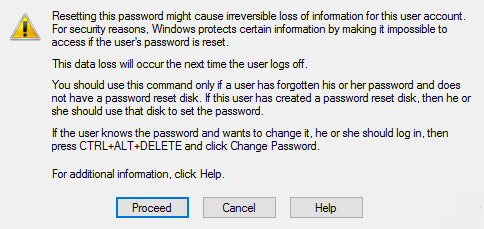
- In lusrmgmr window, you have to click on the Users folder and right-click on defaultuser0 entry, choose Set Password option as well.
- Then tap on Proceed here:

- Now type in a new and simple+easy in order to remember the password and confirm it. tap on OK.
- You’ll get confirmation that the password has been set for defaultuser0 and also you can now relax. Reboot to normal mode as well.
The first thing we’re going to try is enabling a hidden administrator account in Windows. In order to do this you guys will need Windows 10 DVD or USB along with Windows 10 setup, and here’s exactly what you have to do:
- First, boot your computer via the Windows 10 DVD or USB.
- Choose the correct time and keyboard type.
- Next, just tap on Repair your computer. It should be located in the lower-left corner actually.
- On the Choose an option screen, you have to select Troubleshoot.
- Tap on Command Prompt.
- Whenever Command Prompt opens, then just enter the following line and click on the enter in order to execute it:
- net user administrator /active: yes
- Finally, restart your computer.
After doing this you should then have to enable the hidden administrator account. Now you guys can use an administrator account in order to create new users accounts and delete the Defaultuser0 account as well. In addition, whenever you start Command Prompt you guys can also create a new account right from there through typing the following lines and tapping Enter after each and every line:
net user “Jack” xxyyzz /add – this will basically create a new user called Jack along with a password xxyyzz
net localgroup administrators “Jack” /add – It will make turn user Jack into the administrator as well
Run Delprof2 | defaultuser0
Delprof2 is basically an interesting little program that helps you to delete inactive user profiles. As a quick reminder, that many years ago, Microsoft released Delprof. It is a dedicated software aimed at removing users’ profiles. The only catch is that Delprof actually works only on Windows XP.
Delprof2 is basically the unofficial successor to Delprof and it’s also compatible along with Windows 7, Windows 8.1, and Windows 10 as well.
The tool reads the account properties and whenever it detects an account whose status is “inactive”. It suggests users delete it actually.
Defragment your hard disk
- The first step is actually to reinstall the previous Windows version which was working just fine. When the process completes, then do not install any apps or software whatsoever as well.
- Run disk defragmentation via the built-in defragmentation program. Do it three or four times along with a half an hour pause actually.
- Now, you guys can simply download the official Windows ISO files from Microsoft’s website. However, don’t just reinstall the latest version of Windows that you have downloaded Microsoft. You just have to extract the ISO via the PowerISO software or any other software of your choice as well.
- The next step is basically to run the setup in your old system. A pop-up message will now appear and the first option is already ticked. You have to simply run the setup and your system will be upgraded to the latest version of Windows as well.
- It’s really important not to tap on the second option. This will basically upgrade your old Windows version.
Conclusion
Alright, That was all Folks! I hope you guys like this “defaultuser0” article and also find it helpful to you. Give us your feedback on it. Also if you guys have further queries and issues related to this article. Then let us know in the comments section below. We will get back to you shortly.
Have a Great Day!


